Swallow
  • YOUR FIRST MODEL
    • Setting up your first project
    • Manual setup of a new product
    • Excel Model Upload
    • Create your team
    • Essential concepts
      • Syntax
      • Steps
      • Collections
      • Try Model
      • Spotlight
  • PROCESS
    • Team Management
    • Governance & Collaboration
  • BUILD
    • Building with AI
    • Step builder
      • Understanding step types
      • Ordering step blocks
      • Placeholder mode
      • Up/Downloading models
      • Sharing your model
      • Running tests
    • Inputs
    • Enriching Raw Data
      • Transform Data
      • Enrich via API
      • Data Set
      • Collection
      • Custom Code
    • Setting Up Decisions
      • Exclusions
      • Excesses
      • Endorsements
      • Refer
    • Making Calculations
      • Factors
      • Calculation
    • Outputs
  • TEST
    • Creating New Tests
    • Running Tests
    • Editing Tests
    • Reading & Interpreting Tests
    • Impact Testing
  • DATA
    • Working with real-time data
    • Data Views
    • Data Quotas
    • Troubleshooting
    • API Webhooks
    • Data Downloads
  • ADMIN & SETTINGS
    • Project Management
    • Account Management
  • INTEGRATIONS
    • Introduction
    • Payments
      • Stripe
      • GoCardless
      • Adyen
    • Alerting
      • Slack
      • Zapier
    • Data
      • AWS S3
      • Google Sheets
    • Admin
      • Socotra
      • Guidewire
      • Hubspot
      • Salesforce
  • Developer API
    • Introduction
    • Authentication
    • Errors codes
    • Endpoints
      • /quotes
      • /projects
      • /tests
      • /process
Powered by GitBook
On this page
  • 1. Add a new factor table
  • 2. Name your factor table
  • 2. Format & upload your factor table
  • 3. Review & save your factor table
  • 4. Calculate your final risk factor
  • Output Key
  • Formula
  • Default Value
  • 5. Save the step
  1. BUILD
  2. Making Calculations

Factors

Using the 'Factors' step in the builder to create a table of risk factors, and calculate final ratings

PreviousMaking CalculationsNextCalculation

Last updated 1 year ago

With the 'Factors' step, you can create a table of risk factors, and build calculations that will give you a final risk weightings or rules that you can use in pricing.

How might you use the 'Factor' step?

If you were building a pricing model for insurance, you'll have ingested a lot of data points by the time a customer has inputted their quote information and it's been enriched by other sources.

In order to calculate the final price, you'll need to simplify all of that data into some weightings or rules relating to the risk of the driver or the vehicle they're insuring.

For example, you will need to calculate a vehicle peril rating, taking into account the make of vehicle, its age, engine power and other factors.

1. Add a new factor table

To get started, click the cog symbol in the top right of the 'Factor' step.

Once you've opened the step, scroll down to the 'Factor Table' and click the 'ADD' button in the top right.

2. Name your factor table

Name the factor table you're adding. This will be the key that you use in all subsequent expressions and calculations, so it will need to be unique, descriptive, and easy to understand.

You can use letters, symbols and numbers, but no spaces.

2. Format & upload your factor table

Factor tables can include just one dimension (for example, vehicle engine capacity), or combine multiple related dimensions in the calculation's result (for example, vehicle year of manufacture against the number of year's No Claims Discount held by the driver).

The columns you can include in your factor table are:

  • Input - The key that you've set for your factor table.

  • Value - The value you're rating against. This could be standalone if it were a car make, for example (and you wouldn't need to fill in the 'Value to' column). However, if you wanted to return risk ratings based on numerical ranges, this value would need to be the bottom of the range.

  • Value to - This column is optional, but if you want to return results based on a numeric range, this will be the top value of your range.

  • Result - The risk rating that you want to return for the value on each row.

  • Excess - The excess that you want to return for the value on each row.

  • Exclude - The decision on whether you'll choose to accept or reject the value on each row. This will need to be set to FALSE if you want to accept the row, or TRUE if you'd like to exclude it.

You can then copy a data table and paste it directly into Swallow, or you can drag-and-drop a CSV document, which will upload immediately.

3. Review & save your factor table

Once successfully uploaded, you'll be able to review the table to see that all the data has been uploaded correctly.

You can search for specific values in the table by clicking in the 'Filter Column' row beneath each column title and typing. The table will then filter automatically to show you results matching your search.

In the example below, the table shows the different rating factors of vehicle engine capacity.

To bulk edit the table, you can use the buttons to the top left of the table to download as a CSV, edit and then re-upload your factor table.

Once you're happy with your factor table. Click the 'Save & Close' button.

Once all of your factor tables are uploaded, you'll be left with a full table listing all the different factor tables you've added. It will list out the factor keys, the number of rows in each table, the default value (which is always set as 1), and the number of dimensions used in each table.

You can re-edit any table, or use the search bar in the top right to find a specific table if you've added many.

4. Calculate your final risk factor

Once you've successfully uploaded all of your factor tables, you can write the final calculation for the step, completing all the fields below.

Output Key

This is the name for your risk factor rule or weighting. This will be the key that you use in all subsequent expressions and calculations, so it will need to be unique, descriptive, and easy to understand.

You can use letters, symbols and numbers, but no spaces.

Formula

Write an expression to calculate your final risk factor, using any factors present in your model, including the factor tables you've uploaded.

Here's an example of how you would structure an expression to calculate a vehicle peril rating from vehicle make, vehicle year of manufacture, vehicle year of manufacture against No Claims Discount and vehicle engine capacity, rounded to 4 decimal places:

round({{vehicle_make_factor}} * {{vehicle_year_factor}} * {{vehicle_year_x_ncd_factor}} * {{vehicle_engine_capacity_factor}} , 4)

To learn how to structure your formula in more detail, debug and to see the full glossary, check out our full page on Syntax.

Default Value

This will be the default value that your quote and tests will fall back on if for any reason the calculation doesn't function as expected and return a number. You may want to set this as a worst-case scenario.

5. Save the step

Once you're happy with your factor calculation, just press the 'Save' button in the top right of the screen. You're now ready to head back to the 'Build' screen.

Once you've added the 'Factor' step and named it, like you will with any other step in the Build tool (), you'll need to start adding any factor tables that you'll use to calculate the final risk factor in this step.

more on that here
The 'Factors' step
ADD button for new factor tables
Naming and uploading a new factor table
Upload your factor table dialogue
Reviewing a factor table for ranges of vehicle engine capacity
'Save & Close' button for factor tables
A list of added factor tables
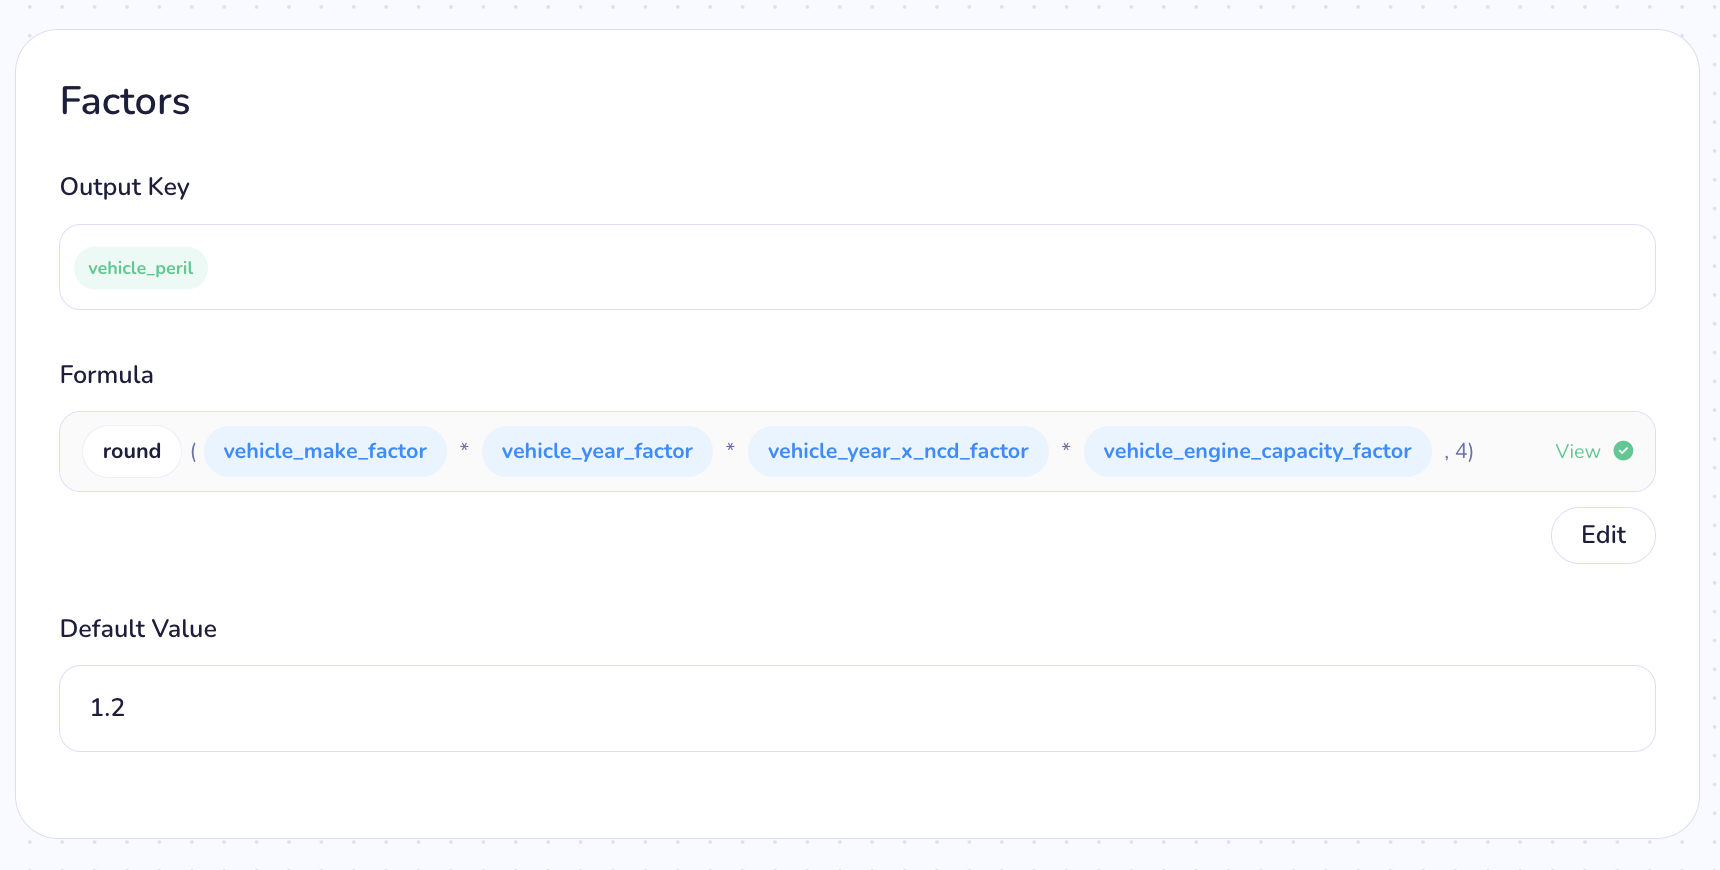
Calculating vehicle peril in a 'Factor' step
Save step button